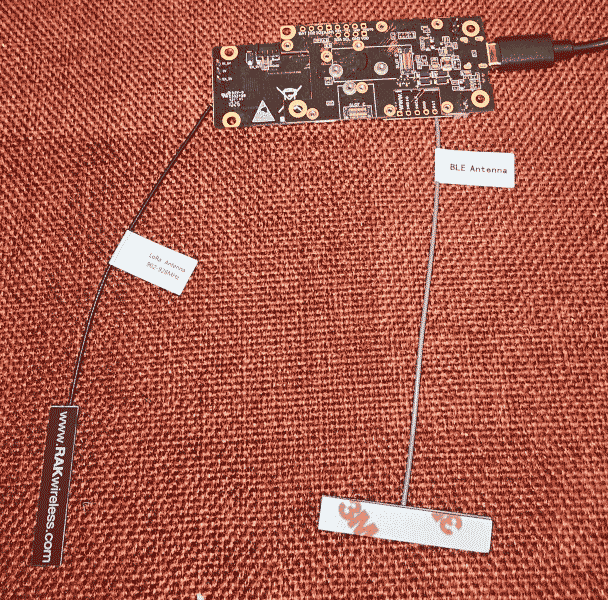
I am delighted to report that I now have constructed three one-watt Meshcore repeaters. I will test them for a few days, to observe some daily charge-discharge cycles. If they perform well in the daily cycle of charge and discharge, then I will be confident about placing them into service.
It will be recalled that on June 9, 2026 (blog article) I ordered several one-watt starter kits from RAK. The kits arrived on July 3, 2026. I had prepared for this day by setting up several Lowes Harbor Breeze enclosures, each with the following cables:
- an MHF1 cable running to the LoRa antenna;
- a PH2.0 female cable connecting to the HB battery holder (watch for backwards polarity); and
- a PH1.5 female cable connecting to the HB solar panel.
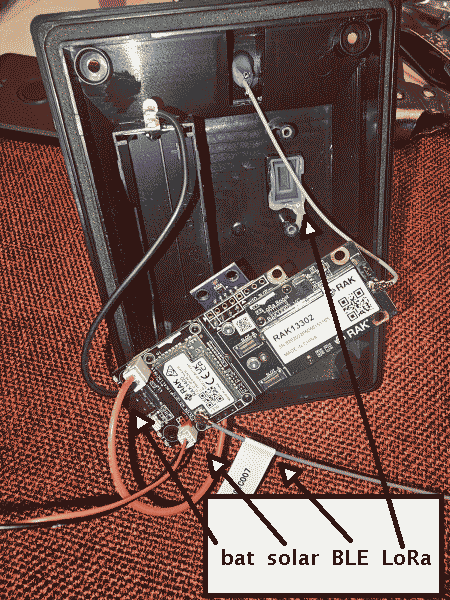
When the one-watt kits arrived, it was a simple matter to carry out the following steps:
- connect a temporary LoRa antenna (seen in photograph above)
- connect a BLE antenna (see “BLE” in photographs above and at right)
- use a USB-C cable to power the radio by a connection to a computer
- use the Meshcore flasher to flash the repeater firmware (“RAK WisMesh 1W Booster (2301 + 13302)”)
- use the Meshcore USB repeater setup to set up the USA LoRa configuration, and the admin password, and device name
- disconnect the radio from the USB-C cable
- disconnect the temporary LoRa antenna
- ensure that a LoRa antenna is connected to the MHF1 cable (see “LoRa” in photograph) and connect it to the radio
- connect the PH2.0 female cable (thus connecting the lithium-ion battery, see “bat” in photograph)
- connect the PH1.5 female cable (thus connecting the HB solar panel, see “solar” in photograph)
- insert a 18650 button-top lithium-ion battery into the HB battery holder
- use a Meshcore companion device to confirm LoRa connectivity to the radio
- close up the HB housing with its four small screws, carefully fitting all cables into place so that the solar panel fits snugly to the weatherproof housing
- use a Meshcore companion device to confirm continued LoRa connectivity to the radio.
For this installation, I chose not to use the HB 1500 mAh battery, and instead selected a Hakadi 3350 mAh 18650 button-top lithium-ion battery to be inserted into the HB battery holder.
It will be appreciated that I chose to use the “internal” power path as described here and here. This approach permits me to use the native telemetry of the repeater firmware to monitor the state of charge of the battery.
The next step, of course, is to place the three new solar-powered one-watt repeaters in the sun. Then I will test them for a few days, to observe some daily charge-discharge cycles. If they perform well in the daily cycle of charge and discharge, then I will be confident about placing them into service. You can see the results of this testing.
Summit County locals can view the three new repeaters with “guest” access (password “hello”). The temporary names for the repeaters are 1W1, 1W2, and and 1W3. Can you connect to them? Please post a comment below.


Leave a Reply