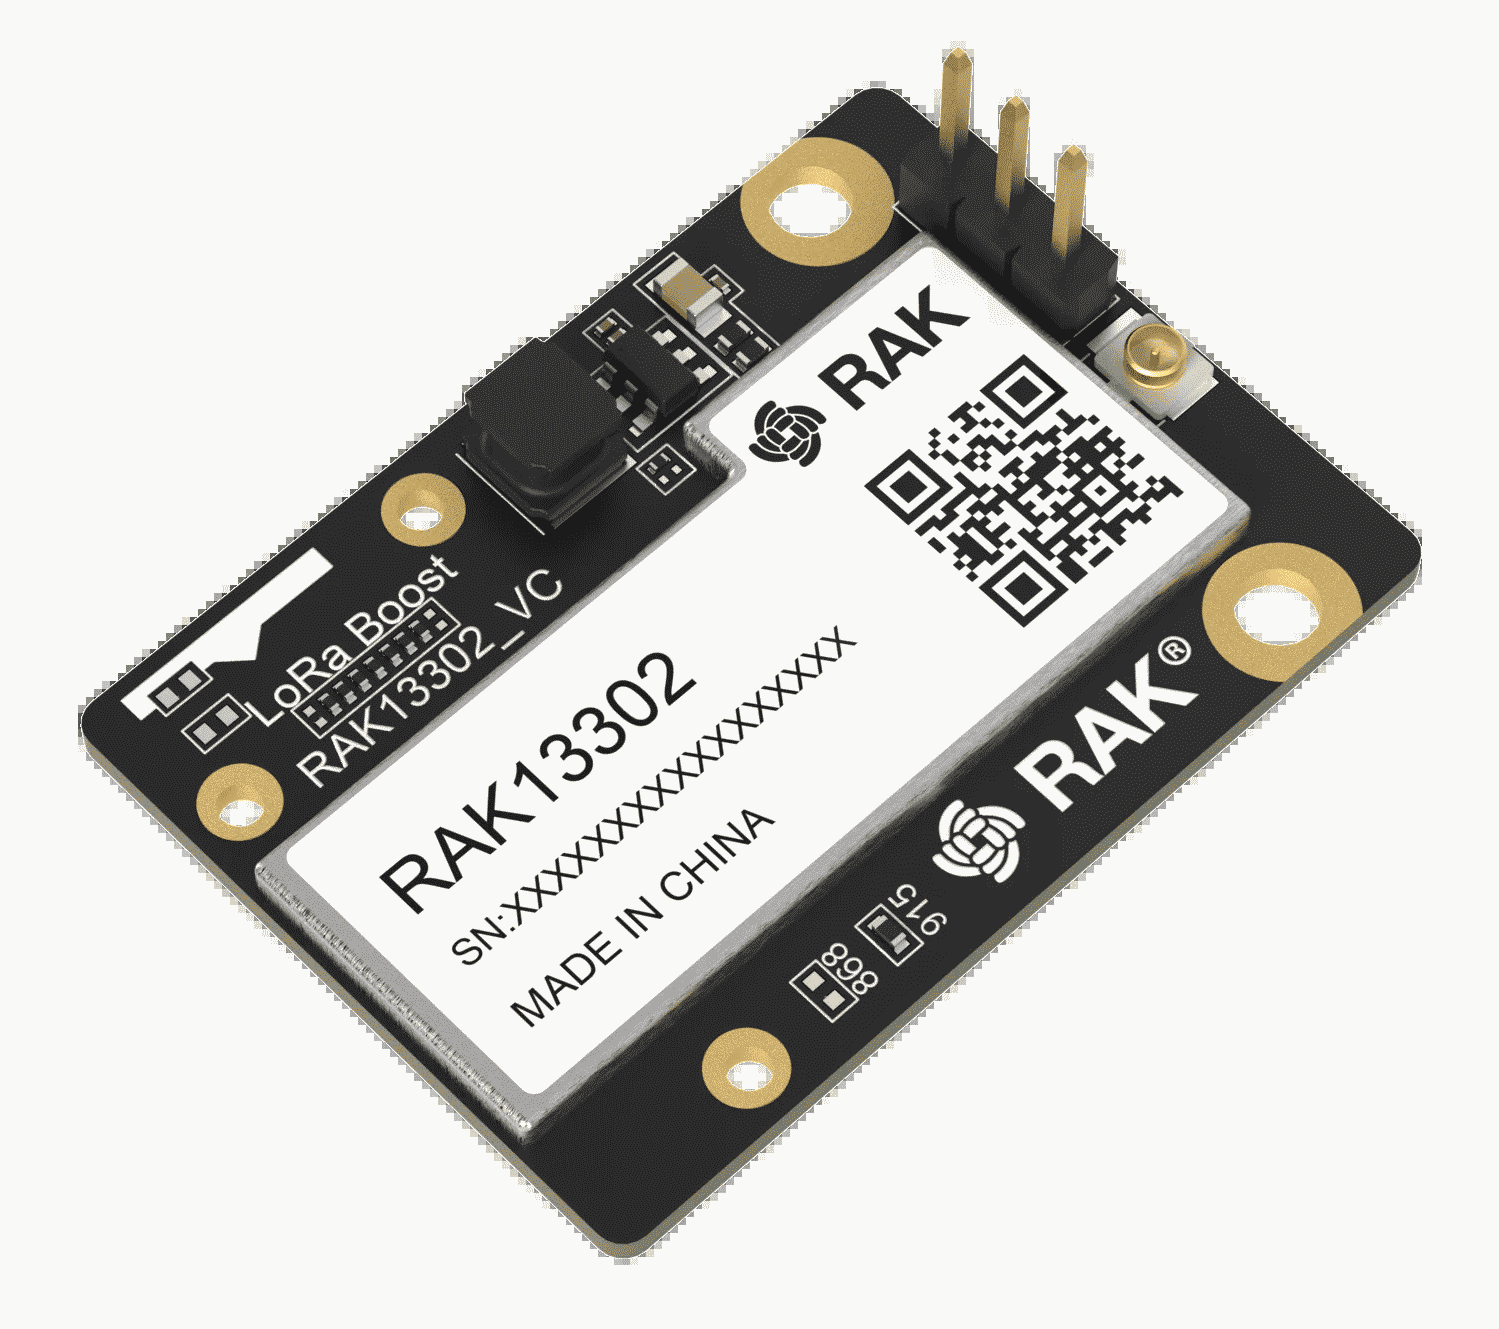
A local mesh hobbyist tipped me off to the imminent release, by RAK Wireless, of a product called 1W Module for LoRa with SX1262 + SKY66122 Booster, seen at right. What is this RAK module? How does it fit together with other RAK modules to make a functioning LoRa mesh device? What are the chief design and implementation challenges for someone considering making use of this device? Will other companies enter this “one-watt” market?
(It will be recalled that depending on the firmware installed, a LoRa mesh device may be put to use as a Meshtastic device or as a Meshcore device.)
A person who is trying to set up a LoRa mesh network will often wish for any given repeater to have a longest possible service distance. A first typical example will be a repeater that is being deployed to try to connect one service area (such as Summit County, Colorado) to a distant service area (such as the Denver front range). A second typical example will be a repeater that is being deployed to try to serve a large geographic area that will likely have only small amounts of end-user traffic (in Summit County, this might be the large and sparsely populated area between Silverthorne and Kremmling).
As ham radio operators know, when it is desired to increase range, it is tempting to simply increase transmit power. But in fact the best ways to increase range are (a) being smarter about the antenna, and (b) being smarter about where to place the antenna. These factors are far more important than trying to pump more power into a given antenna. But it is true that after the operator has optimized the antenna and its placement, it will be helpful to consider increasing an RF power level from its previous level.
By way of background, most LoRa mesh devices transmit at 22 dBm, meaning an RF transmit power of around 158 milliwatts. Some countries, however, permit transmission at 30 dBm, which amounts to one watt. (The US is one of the countries that permits one-watt operation.)
Until now, nearly all RF hardware provided by manufacturers for DIY LoRa mesh solar powered repeater use (here, mostly we are talking about RAK Wireless and Seeed Studio) has been limited to 22 dBm. But recently, RAK announced the release of the radio shown above.
What about ESP32-based LoRa mesh solar powered repeaters? Yes, it is true that there have been some one-watt solutions offered for the DIYer that is willing to use an ESP32 controller to construct a LoRa mesh repeater. But if the repeater is going to be solar powered, then there is no choice but to acknowledge that the ESP32 controller is going to run down the battery maybe eight times faster than a controller from the nRF52 family. This means that the DIYer who is in a country where one-watt LoRa operation is permitted will want to pursue a one-watt LoRa solution that works with an nRF52 controller. And so far as I can see, it looks like right now the only game in town is the RAK13302 radio shown above.
What is this RAK module? This module is intended to provide one watt of transmit power for LoRa mesh, which is about six times more more power than the legacy power level.
This absolutely does not mean that a repeater using this module will be able to transmit six times farther. One can model the relationship between transmit power and transmit distance according to an inverse-square law (or even inverse-cube). In this context, kicking the transmit power from 158 mW up to one watt is unlikely to extend range by more than perhaps a factor of 2 or 2½. For a repeater with a less than optimal antenna, or for a repeater that has been unwisely sited, kicking the transmit power from 158 mW up to one watt might make a negligible improvement in transmission distance.
As seems to happen for all LoRa mesh hardware building blocks, any given device will have two or three names. This leads to endless confusion for users. This device, for example, is variously called by any of these names:
- 1W Module for LoRa with SX1262 + SKY66122 Booster
- RAK13302
- SKU 116205
This radio is priced (on the RAK web site) at $15.
How does it fit together with other RAK modules to make a functioning LoRa mesh device? In the world of DIY devices for LoRa mesh, it pretty much never happens that any single module provides all needed functions (LoRa radio, BLE radio, battery charging control, and microcontroller). Instead the LoRa radio is one module and other functions are in a separate module. (Why is this? I suspect that splitting up the functions among distinct modules is done to facilitate getting approvals from regulators such as the FCC.)
Until now, the design of a LoRa mesh device has generally called for several building blocks:
- a processor (microcontroller) typically having a Bluetooth Low Energy radio and a Nordic nRF52 controller;
- a LoRa radio (typically a Semtech radio such as the SX1262); and
- optionally, a GNSS positioning radio.
In a solar powered repeater, the designer will typically omit any GNSS radio or will turn it off, to conserve power.
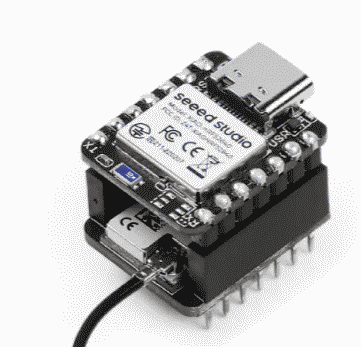
With Seeed modules, the typical way to combine a processor-and-BLE module with a LoRa radio is to stack them using the Wio connector ecosystem, as seen at right.

With RAK modules, the typical way to combine the modules is through RAK’s WisBlock connector ecosystem, using a 19003 or 19007 baseboard (the latter shown at right).
In addition to offering the one-watt radio by itself, RAK has defined an SKU 116217 (also called WisMesh 1W Booster Starter Kit) which includes:
- Nordic nRF52840 BLE Core Module, also called RAK3400, also called SKU 110219;
- 1W Module for LoRa with SX1262 + SKY66122 Booster, also called RAK13302, also called SKU 116205; and
- WisBlock Base Board 2nd Gen, also called RAK19007, also called SKU 110082.
This one-watt kit is priced (on the RAK web site) at $39.
The RAK3400 plugs into the RAK19007 baseboard using WisBlock connectors and is secured to it with screws. The RAK13302 likewise plugs into the RAK19007 baseboard using WisBlock connectors and is secured to it with screws.
Avoiding any add-on RF filter. Sometimes the DIY hobbyist, when constructing a LoRa repeater, will be tempted to add an RF filter to try to reduce noise from other devices that emit RF at nearby frequencies. This is unnecessary with the RAK one-watt kit because the one-watt RAK radio already provides two extremely effective SAW filters. And indeed adding such an external RF filter will not only provide no filtering benefit, but will also attenuate signals slightly. So it should not be used.
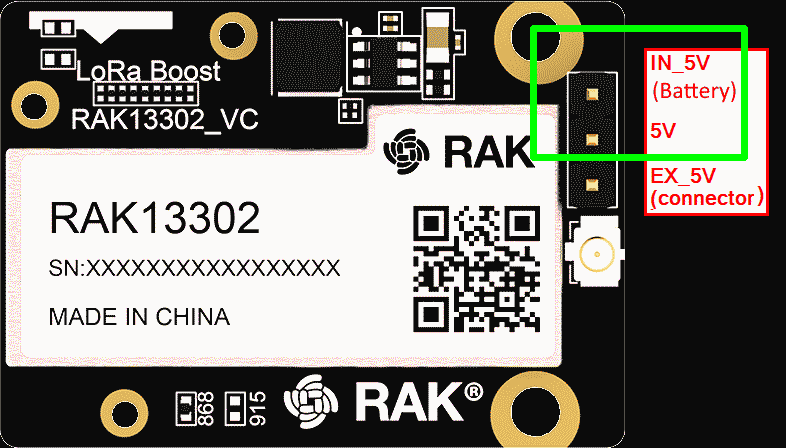
How are the antennas connected? With the RAK one-watt kit, the bluetooth low energy (BLE) antenna gets connected at D in the photo below. The LoRa antenna gets connected at A in the photo below.
Choosing how to power this one-watt kit. The designers of the RAK one-watt kit offer two ways to deliver power to the kit:
- External power. To use external power, we set a particular jumper at A in the photo below. We then provide 5 volts DC at B. This might be from ground power, or might be from some externally managed solar panel and battery. For this approach for powering the kit, we leave connectors E and F empty. This external-power approach powers the RAK13302 directly. The RAK13302 passes the 5 volts along to the RAK3400, which in turn regulates the voltage down to 3.3V, and in this way the RAK3400 is powered from the RAK13302.
- Internal power. To use internal power, we set a different jumper at A. We connect a lithium battery at F. We then provide 5 volts at E, typically by means of a solar panel or perhaps from ground power. The one-watt radio gets its desperately needed 5-volt power from a “boost converter” that is provided within the one-watt radio. The boost converter draws 3.3 volts from the baseboard and makes it into 5-volt power for the one-watt transmitter.
The great advantage of “internal” is that you can then pull telemetry from the repeater and it will tell you the state-of-charge of the lithium battery. The big drawback to “external” as described above is that there is no telemetry information as to battery status.
Second variant of “external power”. A Youtuber points out that there is a second available variant of “external power”. On this approach, you connect a lithium-ion battery at F, you set the A jumper to “external”, and you connect a five-volt supply at B. This is similar to “internal” in that you can inspect the telemetry to learn the state-of-charge of the battery at F. It is different from “internal” in that the way the one-watt radio gets its desperately needed 5-volt power is not by means of the boost converter but instead gets it directly from the five-volt supply at B.
When might this second variant of “external” make sense? This second variant of “external” makes no sense if your solar panel is a 5-volt panel, because you might just as well keep it simple and connect the 5-volt panel at E (meaning the “internal” approach discussed above). With the 5-volt panel connected at E, you get to have one-watt transmit power at night and on cloudy days.
If you were to connect your 5-volt solar panel at B and set the A jumper to “external” then things would be awry at night and on cloudy days, with limited or nonexistent transmit power.
So this second variant of “external” (provide 5 volts at B, not E, and set the A jumper to “external”) only makes sense for a solar powered repeater if you have some 5-volt source for B that is “always on” even at night and on cloudy days.
How do the LoRa mesh modules get connected to battery storage and a solar panel? In the Seeed Wio ecosystem, the charging controller lives on the nRF52 controller board. As described here, the battery is connected by soldering a wire to that controller board and the solar panel gets connected by soldering wires to two pins on the LoRa radio board.
In the RAK WisBlock ecosystem, the charging controller lives on the baseboard. The battery is connected by means of a PH 2.0 mm 2-pin female connector (at F in the photo below) which (trap for the unwary) needs to be wired with what will seem to be backwards polarity. The solar panel is connected by means of a PH 1.5 mm 2-pin female connector (at E in the photo below) that is wired with conventional polarity.
Adding a temperature, humidity, and barometric pressure sensor. The usual way to learn the temperature at the repeater (for purposes of telemetry) is from a readout of the core temperature of the microcontroller. This approach is the default for repeater firmware, and it is free of any marginal hardware cost because the microcontroller provides this core-temperature information whether you want it or not. But the temperature reported from the microcontroller core may be warmer than ambient. A repeater operator may choose to add a Bosch BME280 sensor to obtain a better measure of ambient temperature, and to get humidity and barometric pressure information. (Such a sensor draws negligible power and so does not harm battery life.) This is easy and inexpensive to do with the WisBlock Base Board 2nd Gen as I will describe.
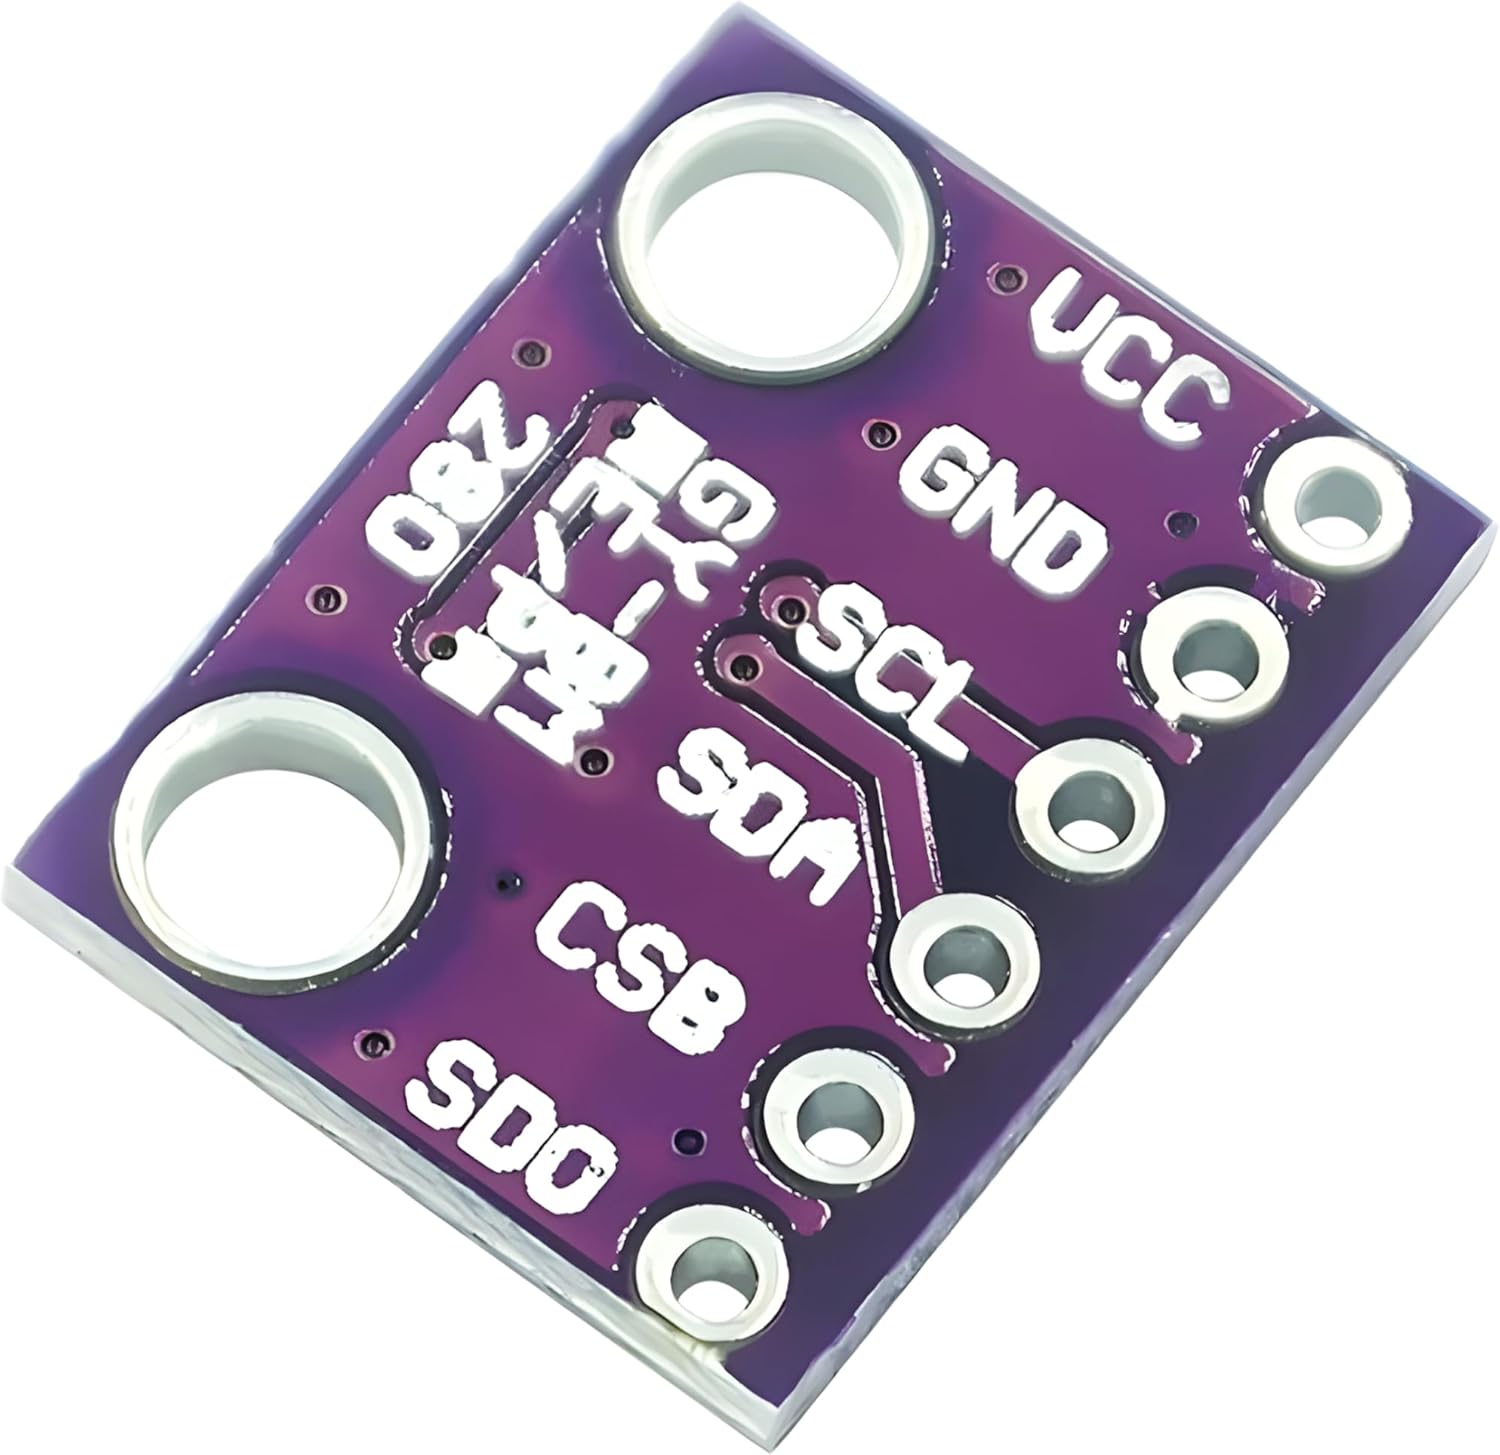
With the WisBlock Base Board 2nd Gen, you use the I2C bus at C in the photo above. Solder a four-pin header to the baseboard, and solder a 3.3V BME280 module (seen at right) to the header. The firmware will notice the existence of the BME280 module and will make all three sensor values available to telemetry.
What are the chief design and implementation challenges for someone considering making use of this device?
The RAK documentation says that the RAK 13302 requires 5V power. In a solar repeater context, this seems impossible to do, since the battery (a lithium-ion battery) never provides 5 volts but instead provides varying voltages at and below 3.7 volts. Yes, there will be a solar panel providing 5V but only when the sun shines. The RAK documention goes on to explain that one way to deal with this is to power the system with a (lithium-ion) battery, shorting together two pins as shown at right.
The answer may be found in the published schematics for this module. RAK provides a boost converter which receives the limited voltage from the lithium-ion battery (over a range of perhaps 3.3 to 3.7 volts) and develops 5 volts for the one-watt amplifier.
A natural next step, for the do-it-yourselfer who chooses the internal-power approach, will be to pick as large a battery capacity as can be afforded. The designer will want to use, for example, a 3350-mAh battery instead of the mere 1500-mAh battery that is standard in the Harbor Breeze lawn light (and that actually tests out at more like 1430 mAh). The bigger battery will hopefully keep from falling too far below 3.7V even at night. (The bigger battery is also less likely to be harmed by cold-temperature charging, as discussed here.)
What about Meshcore firmware? The RAK web page for this one-watt radio fails to mention any Meshcore firmware, instead citing only Meshtastic firmware named like this:
firmware-rak3401-1watt-w.x.yy.zzzzzzz.uf2
The Meshcore firmware page for this one-watt radio presently says to use this firmware:
RAK_3401_repeater-v1.16.0-07a3ca9.uf2
At a quick glance, this Meshcore firmware is for an earlier Raspberry Pi platform, being repurposed for this one-watt nRF52 platform. I imagine that in coming weeks, a fresh update of firmware will get released that is fine-tuned to make best use of the one-watt radio when tied to an nRF52 controller.
How to buy it? Normally a US customer would simply order this product via Rokland, since Rokland is in the US and it means the US customer does not need to worry about customs or tariffs. Unfortunately, Rokland’s shopping cart page for this kit does not have this one-watt kit in stock and is not willing to receive back orders. Rokland merely calls it “coming soon” and offers to email you when it is available. Rokland lists the kit at $48.97.
Given that Rokland cannot presently fill orders for the one-watt radio, I returned to the notion of ordering directly from RAK. What I learned, quite by accident, is that RAK has not one but two types of shipping available. One of RAK’s shipping choices is called “DDP” which supposedly covers all customs and tariff issues for shipping to a US customer. Here is how RAK describes DDP shipping:
DDP Shipping Method: The DDP shipping method stands for “Delivery Duty Paid.” The transit time for DDP shipments is typically 15-20 business days.
So in desperation I did order four of the one-watt kits directly from RAK using the “DDP” shipping option. This added up to $156 for the four kits, and $44.15 for the DDP shipping.
I placed this order with RAK on June 9, 2026. The folks at RAK told me they expected to ship my order on June 18, 2026. But it is now June 21 and the “order status” page merely says “we’re preparing these items for shipping” which is the same thing it has said since June 9. As of today I imagine the Dragon Boat festival is going on so I will need to continue to wait.
(Update. It is now June 24 and as far as I can see, RAK has not yet fulfilled my order that I placed June 9. The Dragon Boat festival is now in the past and no longer serves as an excuse for having not yet fulfilled the order. I do hope that RAK will ship this order soon. Then I get to wait the promised “15-20 business days” for the shipment to arrive.)
Be careful when ordering. The one-watt radio is offered in two variants:
- 800 MHz radio – SKU 115264, and
- 900 MHz radio – SKU 116205.
Correspondingly, the one-watt starter kit is offered in two variants. Confusingly, the shopping cart uses different frequency numbers (868 instead of 800 and 915 instead of 900):
- 868 MHz radio – SKU 115265, and
- 915 MHz radio – SKU 116217.
A US purchaser will almost certainly want to avoid purchasing the 800 (or 868) MHz item, since that is not the band used in the US.
Will other companies enter this “one-watt” market? It would be cause for astonishment if Seeed were to fail to bring a corresponding one-watt starter kit to market very soon.
Where to hold back from using this one-watt radio. In some Meshcore service areas, it would be unwise to use this one-watt radio. An example would be a densely packed area with lots of closely spaced repeaters and lots of end users. In general you would not want one-watt radios there, because the one-watt repeater would accomplish little more than to degrade the noise floor over a large area. (22-dB repeaters will only degrade noise floor over much smaller services areas.)
Concluding thoughts. A first thing to remind ourselves is that it is a mistake simply to throw money and solar- and battery-power resource at a one-watt radio if one were to fail to pay attention to antenna design issues and site planning and antenna-placement issues. The designer should resort to an increase of RF power only if unmet performance needs remain after the designer has given complete attention to antenna and site-planning issues.
The best use cases for this one-watt repeater option are:
- coverage over some large but sparsely used area, and
- linkage between existing mesh networks, across difficult terrain, for example between Summit County and the front range.