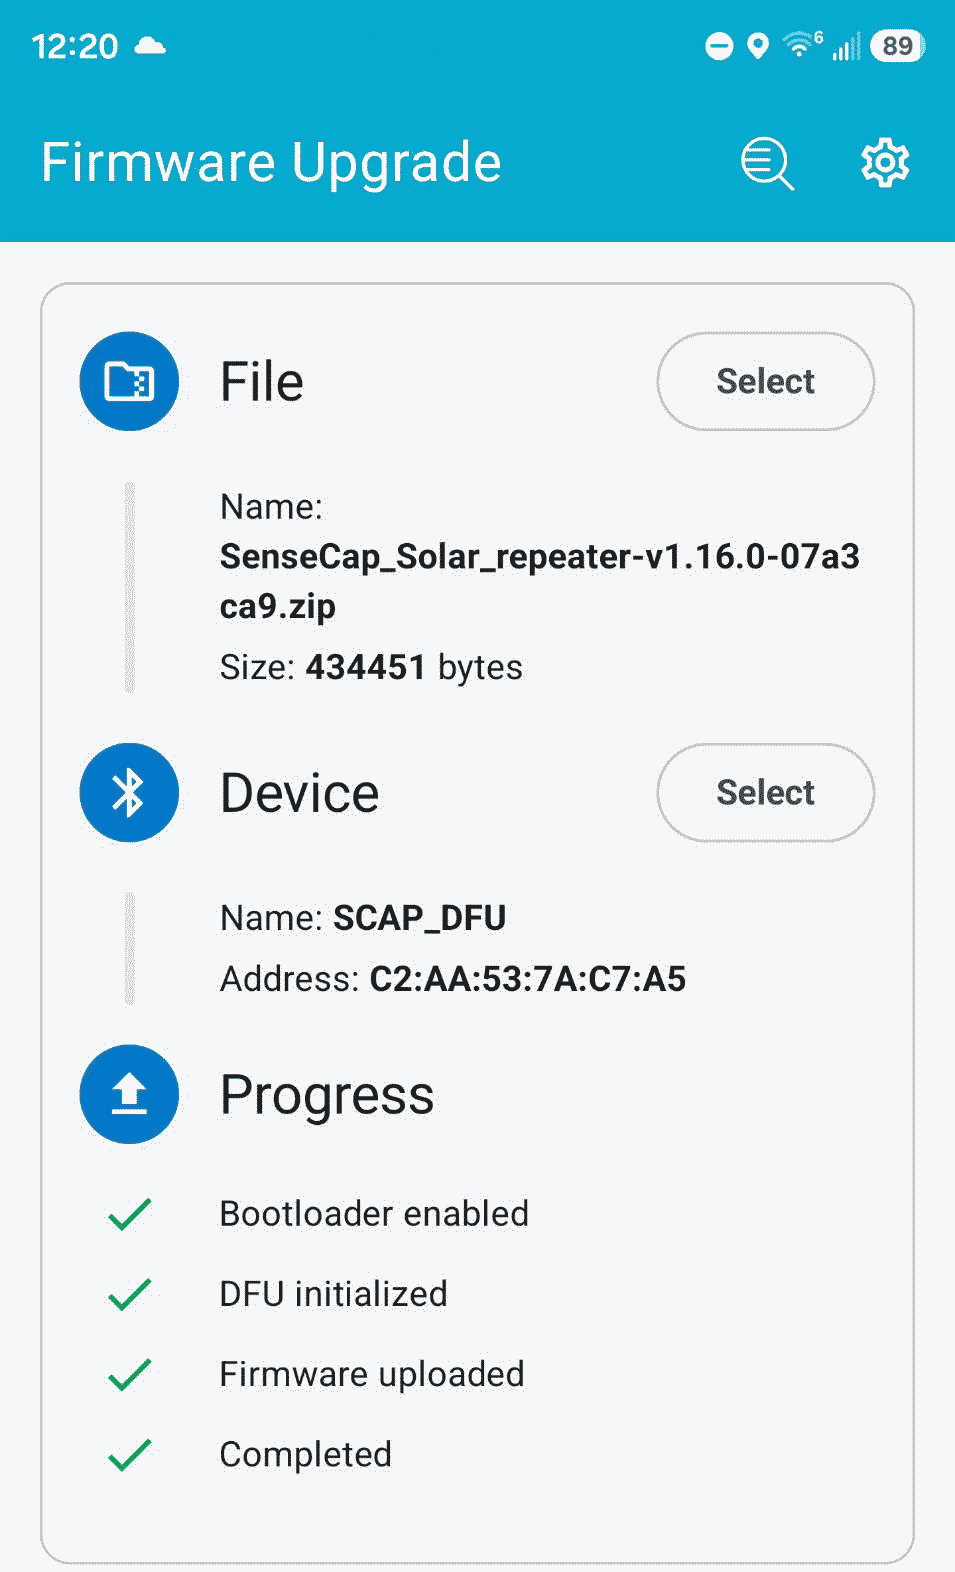
The screen shot at right shows a happy thing that you might be able to accomplish. You might be able to update your Meshcore repeater firmware using Bluetooth. This might save you from having to climb a tower to get at the repeater. But I, at least, had to try many times until I eventually made it work. (In the screen shot at right, see the elusive and hard-to-get green check marks for “firmware updated” and “completed”.) Even now I lack confidence that I could consistently repeat these two green check marks. This blog article describes the OTA firmware update process and my efforts with it.
A starting point to this discussion is to recognize that I am talking solely about Meshcore repeaters that use the Nordic nRF52 family of microcontrollers. This discussion is no help with a repeater using the older and more energy-hungry ESP32 family of microcontrollers.
Another bit of background is that this discussion is in July of 2026, so if you are reading this article many months later, things might have changed.
The bootloader firmware that we are talking about in July of 2026 is version 0.9.2-OTAFIX2.2.
The Android smart phone app that we are talking about in July of 2026 is Nordic Semiconductor nRF Device Firmware Update version 2.11.0 build 26021106 with the logo seen at right.
At this web page you can see an extremely helpful discussion Detailed explanation of the principles and steps of Bluetooth over-the-air upgrade on Nordic nRF52 microcontrollers.
Now let’s start with what we are all very familiar with. We know all about how to do firmware updates of Meshcore repeaters. There are two very familiar ways to do this with a USB-C cable plugged into the device:
- use the flasher at https://meshcore.io/; or
- use a double-tap of a reset button to put the device into DFU mode which opens a file manager window, and drag and drop the new firmware into the device.
It will be appreciated that if a repeater is on a tower, then either of these approaches has the enormous drawback that you have to climb the tower to do the update.
It will also be appreciated that if the USB-C port is inside an enclosure, then either of these approaches has the drawback that you have to open up the enclosure. If you have hiked up a mountain and are at the remote location of the repeater, likely as not you will drop and misplace at least one of the screws that you unscrewed to open up the enclosure.
This article aims to help you learn how to do the firmware update via Bluetooth. This does not save you from the trouble of having to go physically to the place where the repeater is located. But it might save you having to climb a tower. And it might save you having to open up an enclosure.
Briefly the way this works is:
- you go physically to the place where the repeater is located;
- you log in via Meshcore (LoRa) at the repeater;
- you get into the CLI (command-line interface) of the repeater;
- you tell the repeater to commence a Bluetooth over-the-air firmware update;
- you connect to the repeater via Bluetooth using a smart phone app; and
- you use the app to flash the new firmware onto the microcontroller of the repeater.
If all goes well, you will see the two green check marks mentioned above, and the repeater will return to the normal function of being a repeater.
What you ought not to do is to wait until the time comes for a Meshcore repeater firmware update, and only then for the first time decide to try to learn how to do the update via Bluetooth. Instead, you should do two things:
- when setting up the repeater in the first place, ensure that you have set it up with a bootloader that is intended to provide high quality support for Bluetooth firmware updates; and
- while the repeater is on your workbench, practice the Bluetooth firmware update process several times to arrive at some level of confidence that you can repeat this magic after the repeater has been placed on the tower.
Let’s give a name to this bootloader that is intended to provide high quality support for Bluetooth firmware updates. It is called bootloader-0.9.2-OTAFIX2.2 and you can read about it here and here. Again I will emphasize this bootloader is only for BLE (Bluetooth Low Energy) microcontrollers in the Nordic nRF52 family. In the world of Meshcore repeaters, this typically applies to:
- the Seeed SenseCAP Solar Node P1-Pro;
- repeaters making use of Seeed XIAO nRF52840 & Wio-SX1262 radios;
- repeaters making use of RAK 1W radios including the RAK3401 and RAK13302 boards (containing nRF52840, SX1262, and SKY66122 PA chips); and
- repeaters making use of RAK4631 boards (containing nRF52840 and SX1262 chips).
Again, to emphasize, when you are setting up one of these Meshcore repeaters in the first place, the smart thing to do is to ensure that it has this 0.9.2-OTAFIX2.2 from the outset. And we might as well talk about how you can know for sure that you have gotten this right. What you do is log into the administrative interface of the repeater, open up the CLI (command-line interface), and type:
get bootloader.ver
And you might as well start now getting used to the fact that the CLI for Meshcore repeater firmware is case sensitive. Everything is required to be in lower-case letters.
So for example with one of my DIY repeaters, I asked the question “get bootloader.ver” and the answer I got was “0.6.1”. That’s bad news, since the answer we wanted was “0.9.2-OTAFIX2.2-BP1.3”.
You can see a very helpful discussion here entitled Flash the OTAFIX bootloader.
Once you have successfully updated a particular repeater with the 0.9.2-OTAFIX2.2, you will then likely find that it has forgotten how to be a repeater. At that point you will need to flash it again with the repeater firmware. Hopefully it will remember what it knew about the LoRa frequency and spreading factor and bandwidth and coding rate, which for the United states are probably 910.525 MHz, 7, 62.5 kHz, and 5 respectively. If it remembers those things, then you will once again be able to log in via Meshcore LoRa to continue administering the repeater.
What kind of file to upload? As mentioned above, the two familiar ways to update firmware both use a USB-C cable:
- use the flasher at https://meshcore.io/; or
- use a double-tap of a reset button to put the device into DFU mode which opens a file manager window, and drag and drop the new firmware into the device.
If you choose the double-tap approach, then what you will eventually catch onto is that what you must not do is try to drag and drop a ZIP file into the device. The file to drag and drop is called a UF2 file, which stands for “USB flashing format”. The UF2 file contains metadata that tells the bootloader of the processor exactly where in its memory the data needs to go.
In the discussion that follows, I will be describing the idea of using Bluetooth (rather than USB-C) as your way of loading a firmware update file into a repeater that contains an nRF52 microcontroller. What you will eventually catch onto is that if you choose this path for loading firmware into an nRF52 microcontroller, what you must not do is try to load a UF2 file. The smart phone app that you will use for this loading process will puke on a UF2 file. It only accepts ZIP files. Nobody seems to come out and say why this is, but my guess is that it is because the ZIP file is smaller than the UF2 file. For example the version 1.16.0 Meshcore repeater firmware for the RAK one-watt radio has a file size of 879 KB as a UF2 file, but the corresponding ZIP file is smaller at 440 KB. So it would load faster over Bluetooth.
So what are some of the preparations to make, before attempting a Bluetooth OTA firmware update?
First, log in at the CLI of the repeater’s administrative interface. Type “board” to find out what kind of hardware is at the other end of this administrative connection. Answers that you might get include:
- Seeed Xiao-nrf52
- RAK 3401 (for the one-watt radio)
- RAK 4631 (for the 180-mW radio)
- Seeed SenseCAP Solar
There are two reasons that you care about this. First, be alert to the possibility that you logged in at the wrong repeater. What you absolutely do not want to do is to command some repeater to go into OTA mode, and then find out that the repeater is a mile away from where you are located. (Also use the CLI command “get name” to find out the name of the repeater that you are administering, again to avoid finding out that you inadvertently logged in at the wrong repeater.)
The second reason that you care about the “board” is that you need to upload the correct firmware for that board. You do not want to try to upload Seeed firmware into a RAK board or vice versa.
Still another CLI command that you must use during your preparations is “ver”. You want to make very sure that you know which version of repeater firmware is presently on the repeater that you have hiked up to. Typical answers might be:
- v1.15.0-dee3e26 (Build: 19-Apr-2026)
- v1.16.0-07a3ca9 (Build: 06-Jun-2026)
As of right now in July 2026, if you have version 1.16.0 for some particular repeater, then there is no repeater firmware update needed. (You might still find that you need to update the bootloader.) On the other hand, if you have version 1.15.0 (or older) for some particular repeater, then this is an opportunity to update the repeater firmware (and also to update the bootloader if it is not yet up to the 0.9.2-OTAFIX2.2 version).
Preload your smart phone. Yet another preparation is to make sure that you have saved the ZIP file to your smart phone. What you do not want to do is to hike up a mountain to be standing next to some repeater, only then to find that the ZIP file needs to be obtained from some distant place like a web site or a Google drive. The ZIP file needs to be in “my files” in the “internal storage” of your smart phone. A smart way to accomplish this is via a USB-C file transfer from your notebook computer. Another, slower way would be a Bluetooth file transfer from your notebook computer. But the main point here is, you need to preload your smart phone with absolutely every ZIP file that you might need later when you have hiked up to the repeater location. This includes files to be used for updating the bootloader, for example:
- sensecap_solar_p1_bootloader-0.9.2-OTAFIX2.2 (for the Seeed SenseCAP Solar)
- xiao_nrf52840_ble_bootloader-0.9.2-OTAFIX2.2 (for other Seeed repeaters)
- wiscore_rak4631_board_bootloader-0.9.2-OTAFIX2.2 (for the RAK repeaters, both one-watt and 180-mW)
This also includes files to be used for updating the repeater firmware itself, for example:
- RAK_3401_repeater-v1.16.0-07a3ca9 (for the RAK one-watt repeater)
- RAK_4631_repeater-v1.16.0-07a3ca9 (for the RAK 180-mW repeater)
- SenseCap_Solar_repeater-v1.16.0-07a3ca9 (for the Seeed SenseCAP Solar)
- Xiao_nrf52_repeater-v1.16.0-07a3ca9 (for other Seeed repeaters)
So now you are at your workbench and you are practicing this Bluetooth OTA firmware update process. The steps are as follows:
- you make sure you are physically nearby to the place where the repeater is located (meaning within Bluetooth distance);
- you log in administratively via Meshcore (LoRa) at the repeater;
- you get into the CLI (command-line interface) of the repeater;
- you use “ver” and “board” and “get name” and “get bootloader.ver” to make sure that you know exactly where you stand before doing any flashing;
- you use “start ota” to tell the repeater to commence a Bluetooth over-the-air firmware update;
- you see on the CLI screen that it says “OK” and provides a Bluetooth MAC address;
- you connect to the repeater via Bluetooth using your smart phone app, watching closely for that Bluetooth MAC address; and
- you use the app to flash the new firmware onto the microcontroller of the repeater.
If all goes well, you get to see the two green check marks saying “Firmware uploaded” and “Completed”.
It is commonplace to fail. The smart phone app will show various red-colored bad-news messages instead of the precious green check marks. If this happens, go back to “select” and select the device again, and then try the update again. Amazingly, the name of the Bluetooth device may have changed from what it was sixty seconds earlier, while the MAC address might stay the same. Or you may see that the last digit of the MAC address has incremented by one. In any case, try the upload again and likely as not, it will work on the second try.
What happens if you do not finish the OTA update? It is all fine and good to assume that you will get the two precious green check marks, meaning that you finished at least one OTA update. (If the update you were doing was the bootloader, you probably also need to do a second update for the repeater firmware.) But what if you fail to finish the OTA update? There are many ways you could fail. A first way is to discover that you are too far away from the repeater (beyond Bluetooth distance). A second way is to discover that your smart phone battery has run down. A third way is to discover that you did not plan ahead by preloading the needed ZIP file onto your smart phone. There are probably half a dozen other ways to fail to finish the OTA update.
But we return to the original question. What if you say “start ota” and then fail to get two green check marks? I absolutely do not know if there is any way out of this other than to open up the enclosure and power-cycle the radio. Yes, this may require climbing the tower. You can see this helpful article entitled OTA updates for repeaters.
You have two green check marks. Are you done? If the update you were doing is only the repeater firmware, then that’s fine and with two green check marks you are done. (Be prepared to have to try the Bluetooth upload twice.) Go back into the Meshcore administrative interface via LoRa and confirm that you can log in and do normal administrative things. Use “ver” to confirm that you did indeed update the repeater firmware to the new version.
Keep in mind that your repeater has likely now forgotten what time it is. Use the CLI command “clock sync” to tell the repeater what time it is.
If the update you were doing is the bootloader firmware, then the two green check marks might not mean you are out of the woods, because the repeater may have forgotten how to be a repeater. In the smart phone app, go back to “select” and choose the file for the repeater firmware, and once again select the device (the repeater at its Bluetooth MAC address), and upload the repeater firmware, watching for the precious two green check marks. Again be prepared to have to try the Bluetooth upload twice.
Go back into the Meshcore administrative interface via LoRa and confirm that you can log in and do normal administrative things. Use “ver” and “get bootloader.ver” to confirm that you did indeed update the firmware (bootloader or repeater or both) to the new version.
Why can’t I do the whole thing over Meshcore LoRa in the repeater administrative interface? Why is it that for this OTA update, you have to physically travel to the repeater location, and get within Bluetooth distance? Why can’t you just do the whole thing from the comfort of your armchair, clicking around in the Meshcore repeater administrative interface?
A main reason is that the file to transfer is hundreds of kilobytes in size, while Meshcore communicates with text messages. It would take tens of minutes to send the amount of data that we are talking about, and it would invariably fail, because individual packets would get lost. Intermediate routers might (perfectly justifiably) discard lots of packets because the radio bandwith is being overwhelmed.
So yes, you need to go in person to the repeater location and get within Bluetooth distance. Only then will you have a communications channel with enough bandwidth to transfer such a large data file. But at least you hopefully won’t have to climb a tower.
Leave a Reply